A personal project of mine. The concept is a retro-style First Person Shooter set in a cyberpunk dystopia. The unique aspect of this game would be its fluid and fast movement mechanics similar to that found in DUSK. I am the Lead Game Designer and sole programmer on this project, with my colleague Sean Uslanian being the level designer. The game has been released as a demo with one feature-complete level on Itch.io.
Character Controller
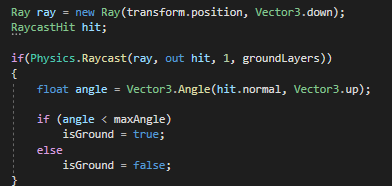
The code used to calculate the angle of the ground the player is on
|
The character controller was sourced from GitHub user TheAsuro, which I have used before. However, unlike my previous use of it, I modified and added to it to improve the functionality. First, I set up a proper ground detection system for the player using a collider placed at the players' feet, as I feel that it's more reliable than raycasting. I also added to this ground detection a way to detect the angle of the surface the player is walking on, as seen on the left. It takes the vector of the normal of the plane the player is on and the vertical axis vector and uses the Vector3 Angle function to calculate the angle.
|
In addition to this, another component was added to fix a strange bug where the player would "stick" to walls. This is a common error encountered by rigidbody character controllers that set the player's velocity directly to the rigidbody instead of applying a force. The fix was a collider that found walls around the player, and checking during movement calculation if the next step of player movement would put them in the wall, and stopping the movement. If I were to redo this project, I would first remake the movement code from the ground up to apply a force instead of assigning the velocity.
AI using a Finite State Machine
For the AI of the game, I wanted them to have a certain level of intelligence and not just blindly walk towards the player. In addition, I wanted any AI system I made to be able to handle several types of actions and be reconfigured for different enemies without requiring new code for each enemy type. My solution was to implement a Finite State Machine (FSM) so that the AI would be able to switch between different states and each enemy type would only require small changes to code for different actions. Following a guide I found online here I followed along and created a FSM system in my game. I went beyond the tutorial by configuring the actions of the states for my situation, for instance making the AI move with a NavMesh, which is far more useful for AI movement in this situation, and easy to work with. The specific aspects I would like to highlight here are the way it handles events, and how it processes actions for each state.

The event system for the state machine
|
This small section of code handles events that are passed into it from outside code. This allows the programmer to add transitions to other states based on certain events they specify. For instance, I use this to transition the AI from patrolling to an alert state when the player is detected by a collider. As long as the state that is currently active has a transition case for the event, this code will change to the specified state.
|
|
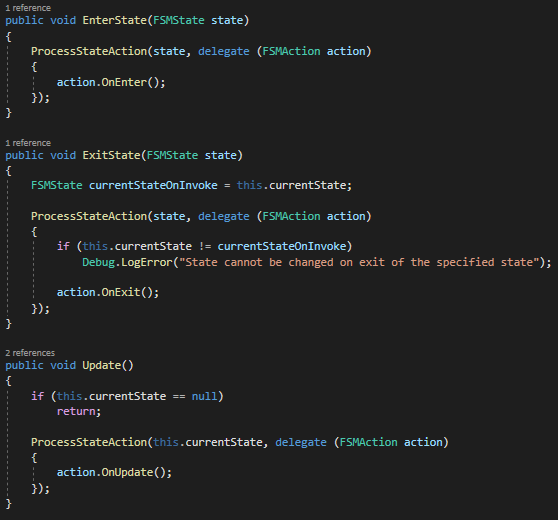
The code on the right is the part of the state machine that processes the actions of the state that is currently active. EnterState and ExitState are called from other parts of the state machine upon one state transitioning to another. The Update function can be called by the programmer in the script where the FSM is used. Its intended use is to be called whenever the programmer wants the state machine to update itself, mostly from a function like Unity's Monobehavior Update function which is called every frame. In each of the three functions here, the delegate is being defined in different ways so that it can be used in the ProcessStateAction method to have different functionality based on which function it is called from, for instance, Update calling the OnUpdate function of the action. Simply put, the functions tell the state machine to invoke the state's actions relevant to the situation.

|
Overall, the state machine is a useful tool for the AI for this game, and allows both programmers and designers make enemies that react in the ways we want. As we develop the game, we'll be adding a few different enemy types with this system, such as melee enemies and ranged enemies.
|
Designing AI tools for ease of use
As this enemy AI would be used by my level designer and not, primarily, myself, I wanted to make sure it would be easy to use and simple to understand how each variable functions. In addition to simple things like ScriptableObjects to change settings globally, I also implemented several Gizmos so certain aspects of the AI can be easily viewable to the designer. Here is an overview of the AI GameObject.
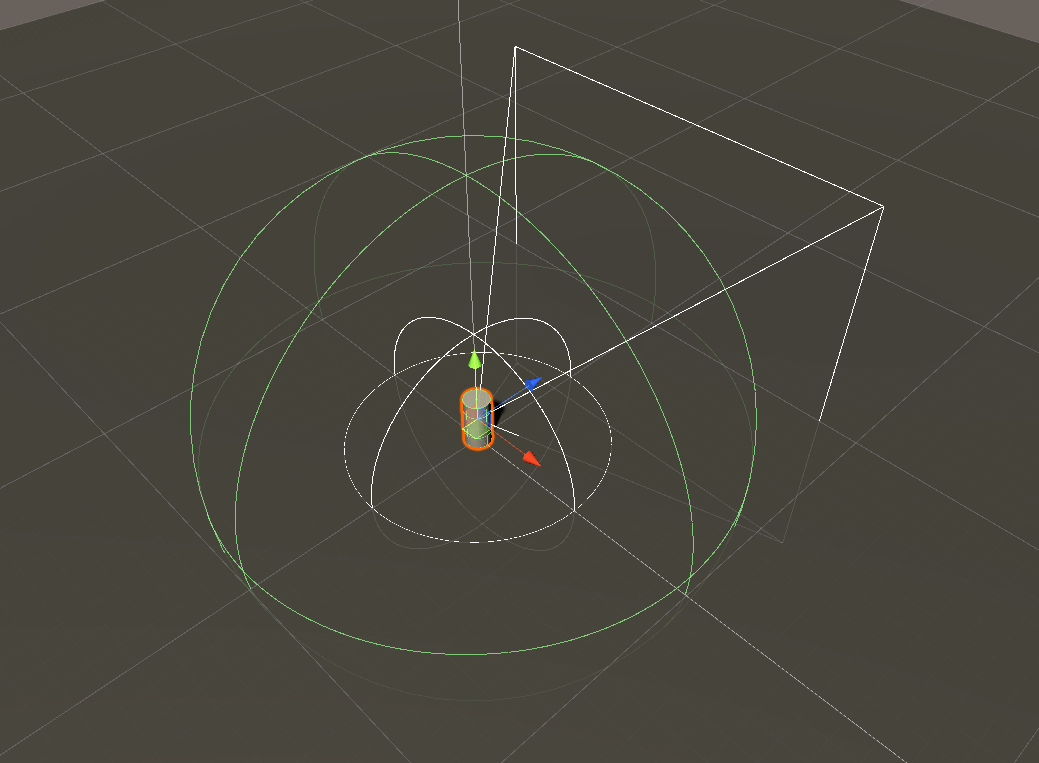
The outer green sphere is the outer radius of the trigger collider that detects the player. The view frustum emanating from the front of the object shows the cone of sight within which the player can actually be seen by the AI. I will get into details about this shortly. Finally, the smaller sphere is the radius within which the AI wanders around during its wander state in the FSM. It will only go to points valid on the NavMesh. If a safe path cannot be found, it tries again until it finds a valid one, or until it reaches maximum attempts, when it will log an error and safely end the loop.
|
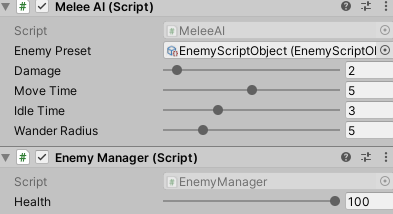
In addition to the Gizmos, the attributes exposed in the inspector are made sure to be clean and understandable. They are constrained to ranges where applicable and clamped to reasonable numbers to keep the designer from accidentally making changes to variables that drastically affect gameplay.
|
|
AI Line of Sight
One disadvantage of the AI script as it used to function is that the AI could detect the player no matter what obstacles were in its way, leading to annoying gameplay and unrealistic AI behavior. To fix this, I added a simple line of sight check to the player detection script.
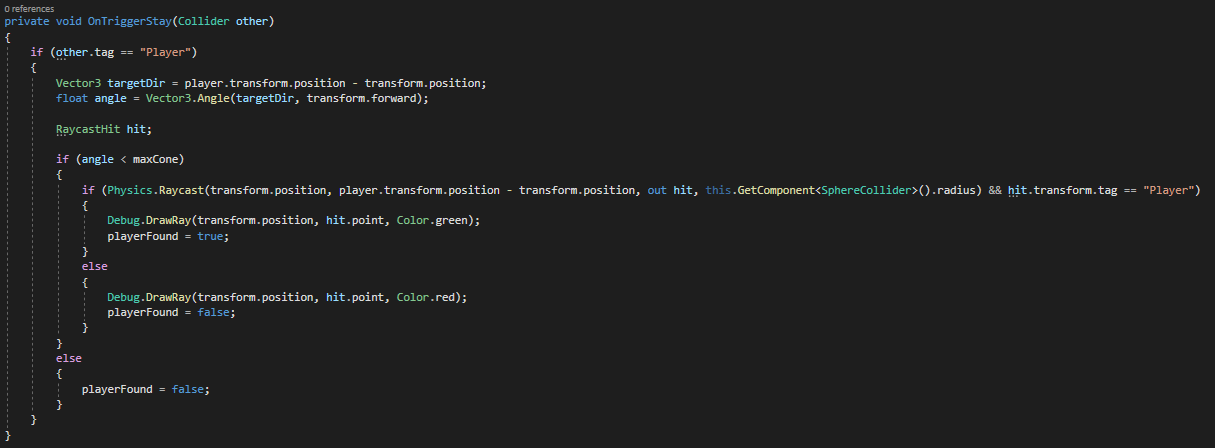
This script finds the player and does some calculations to find its' location relative to the AI's 'view'. The script should be relatively self-explanatory to those familiar with this kind of calculation, but for the sake of explanation I will briefly go over it. First, if the player is inside the larger green sphere (see above), the script will find the player's direction relative to the AI, then calculates the angle between the player and the AI's forward vector. If that angle is within a specified angle (a float variable, can be adjusted between 1 and 90 degrees for simplicity), the script then sends out a raycast to find any obstruction between the AI and the player. If no obstruction is found, the script updates the boolean variable and the State Machine updates accordingly to change to an 'Alert' state. Additionally, the ray is drawn with a green color just in the Unity scene view, for test purposes. If an obstruction is located, the player is not marked as being found and a red ray is drawn.
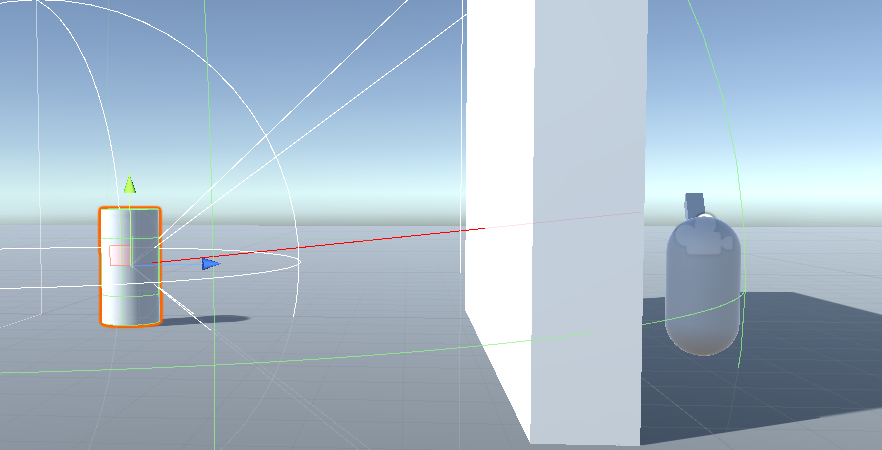
The AI line of sight failing to detect the player because of a wall. Note the red line.
|

The AI line of sight succeeding in detecting the player. Note the green line.
|
This system allows for far more advanced player/enemy interaction. For instance, the player hiding from enemies behind an obstacle while the enemies inspect the player's last seen position. This system is also flexible enough to allow for things like windows, since they could be tagged to ignore raycasts, allowing the AI to see through them.
